
Yocto OS on UltraScale+ ZCU102
This tutorial is a step-by-step guide which shows how to create a custom Yocto-linux distribution for the Xilinx UltraScale+ ZCU102. The passages have been tested ONLY on the ZCU102, but they should be working also for other Xilinx heterogeneous boards, with CPU and FPGA.
A basic bootable image can be downloaded here: Download Yocto ZCU102
Last update the 11/05/2022 - Tutorial created by R. Meloni the 13/01/2022
Contact us
If you encounter any errors which are not in the Troubleshooting section of this page, please open an issue on GitHub, or send an e-mail to:
Raffaele Meloni - raffaele.meloni99@gmail.com
Daniel Madroñal - dmadronalquin@uniss.it
System Requirements
Please, before starting, make sure you meet the following requirements:
- A host machine with a Yocto supported Linux distribution. I’ve used Ubuntu 20.04 LTS on Asus Rog Zephyrus G14 2021.
- At least 65GB free space disk on your host machine (the building system requires this free space).
- A stable Internet connection to fetch repositories and download files. Fast connection is recommended because many errors can be encoutered because of a bad connection.
- All required packages installed on the host machine.
Further details at Yocto documentation (3.4)
Build OS instructions
The following steps are needed to port Linux Yocto on the ZCU102.
Download layers
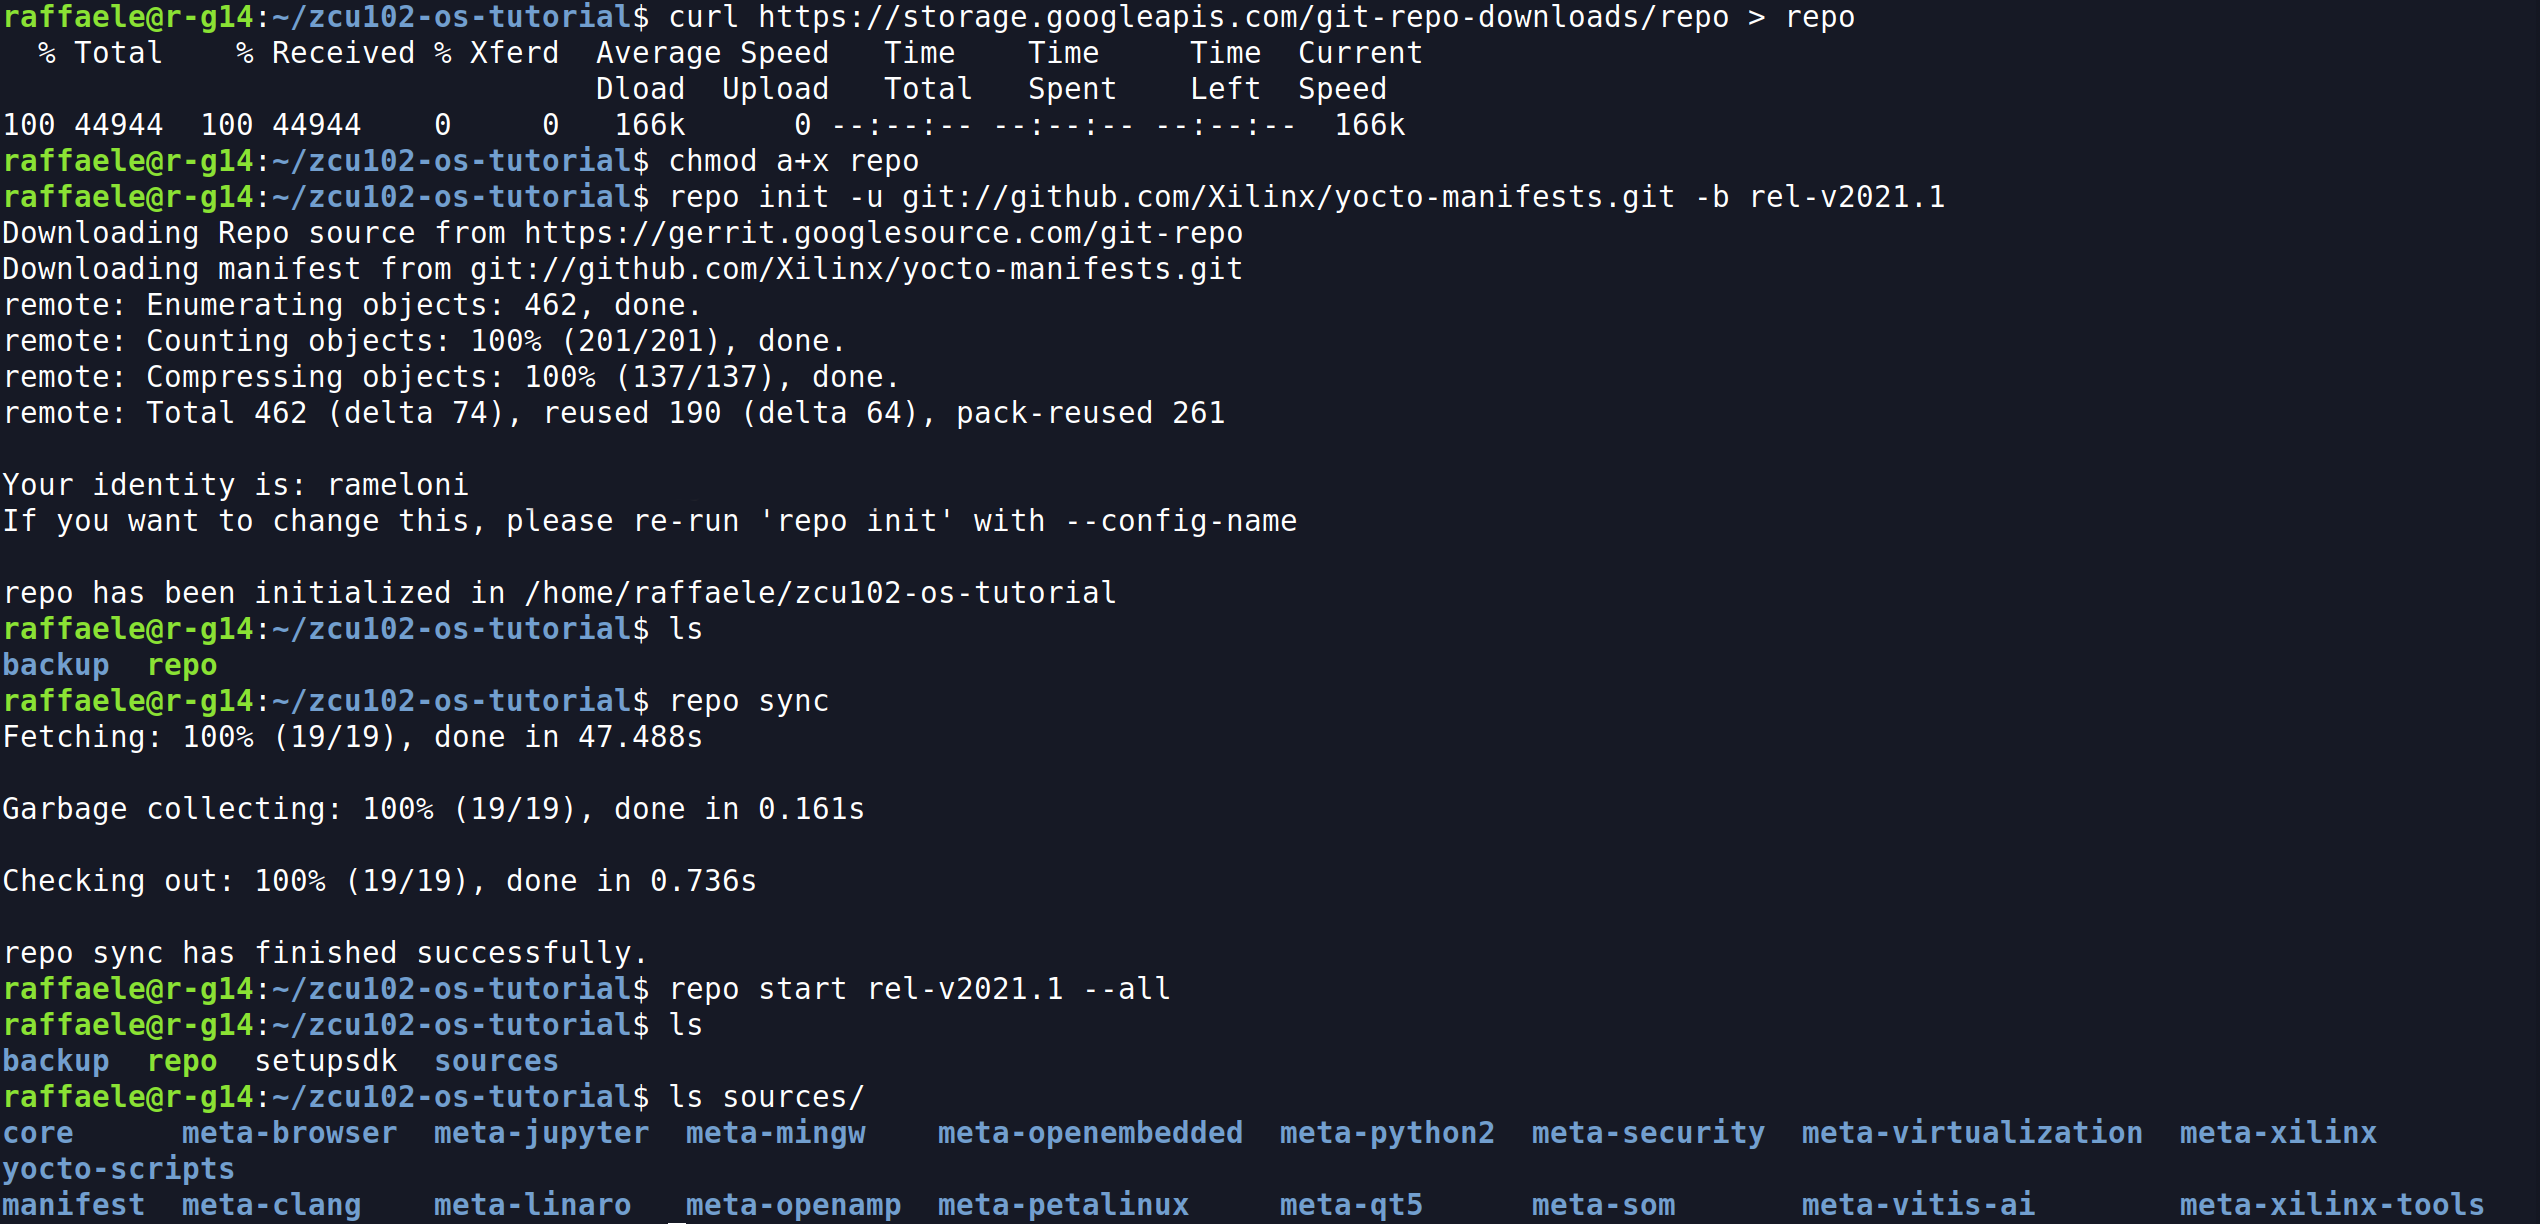
Create a working directory (e.g ~/bin/ or another), cd into it and install the repo script:
# from your working directory
$ curl https://storage.googleapis.com/git-repo-downloads/repo > repo
$ chmod a+x repo
# test repo
$ repo --help
Download and fetch the manifest for required layers. Replace <release> with a supported release, e.g. rel-v2021.1 if you have installed Ubuntu 20.04 LTS on the host machine:
$ repo init -u git://github.com/Xilinx/yocto-manifests.git -b <release>
$ repo sync
# Checkout the corresponding release for each repository. If you don't it, all repositories will not have the correct release branch
$ repo start <release> --all
Repo uses a manifest: an XML file that describes all the required repositories. It can manage all of your git repositories, so they are synced every time.
Now layers are available on the working directory.
Configure Yocto
Launch the Yocto Environment:
# Setupsdk is a wrapper for the familiar "oe-init-build-env" Yocto script. It creates build directory
$ source setupsdk
Configure bblayers.conf like bblayers.conf.template and edit local.conf:
# Select the correct target machine
MACHINE ?= "zcu102-zynqmp"

# Generate u-boot Boot Script. Append this line
EXTRA_IMAGEDEPENDS_append = "u-boot-zynq-scr"
Launch bitbake
Once Yocto is configured, you can build the OS image running:
$ bitbake petalinux-image-minimal
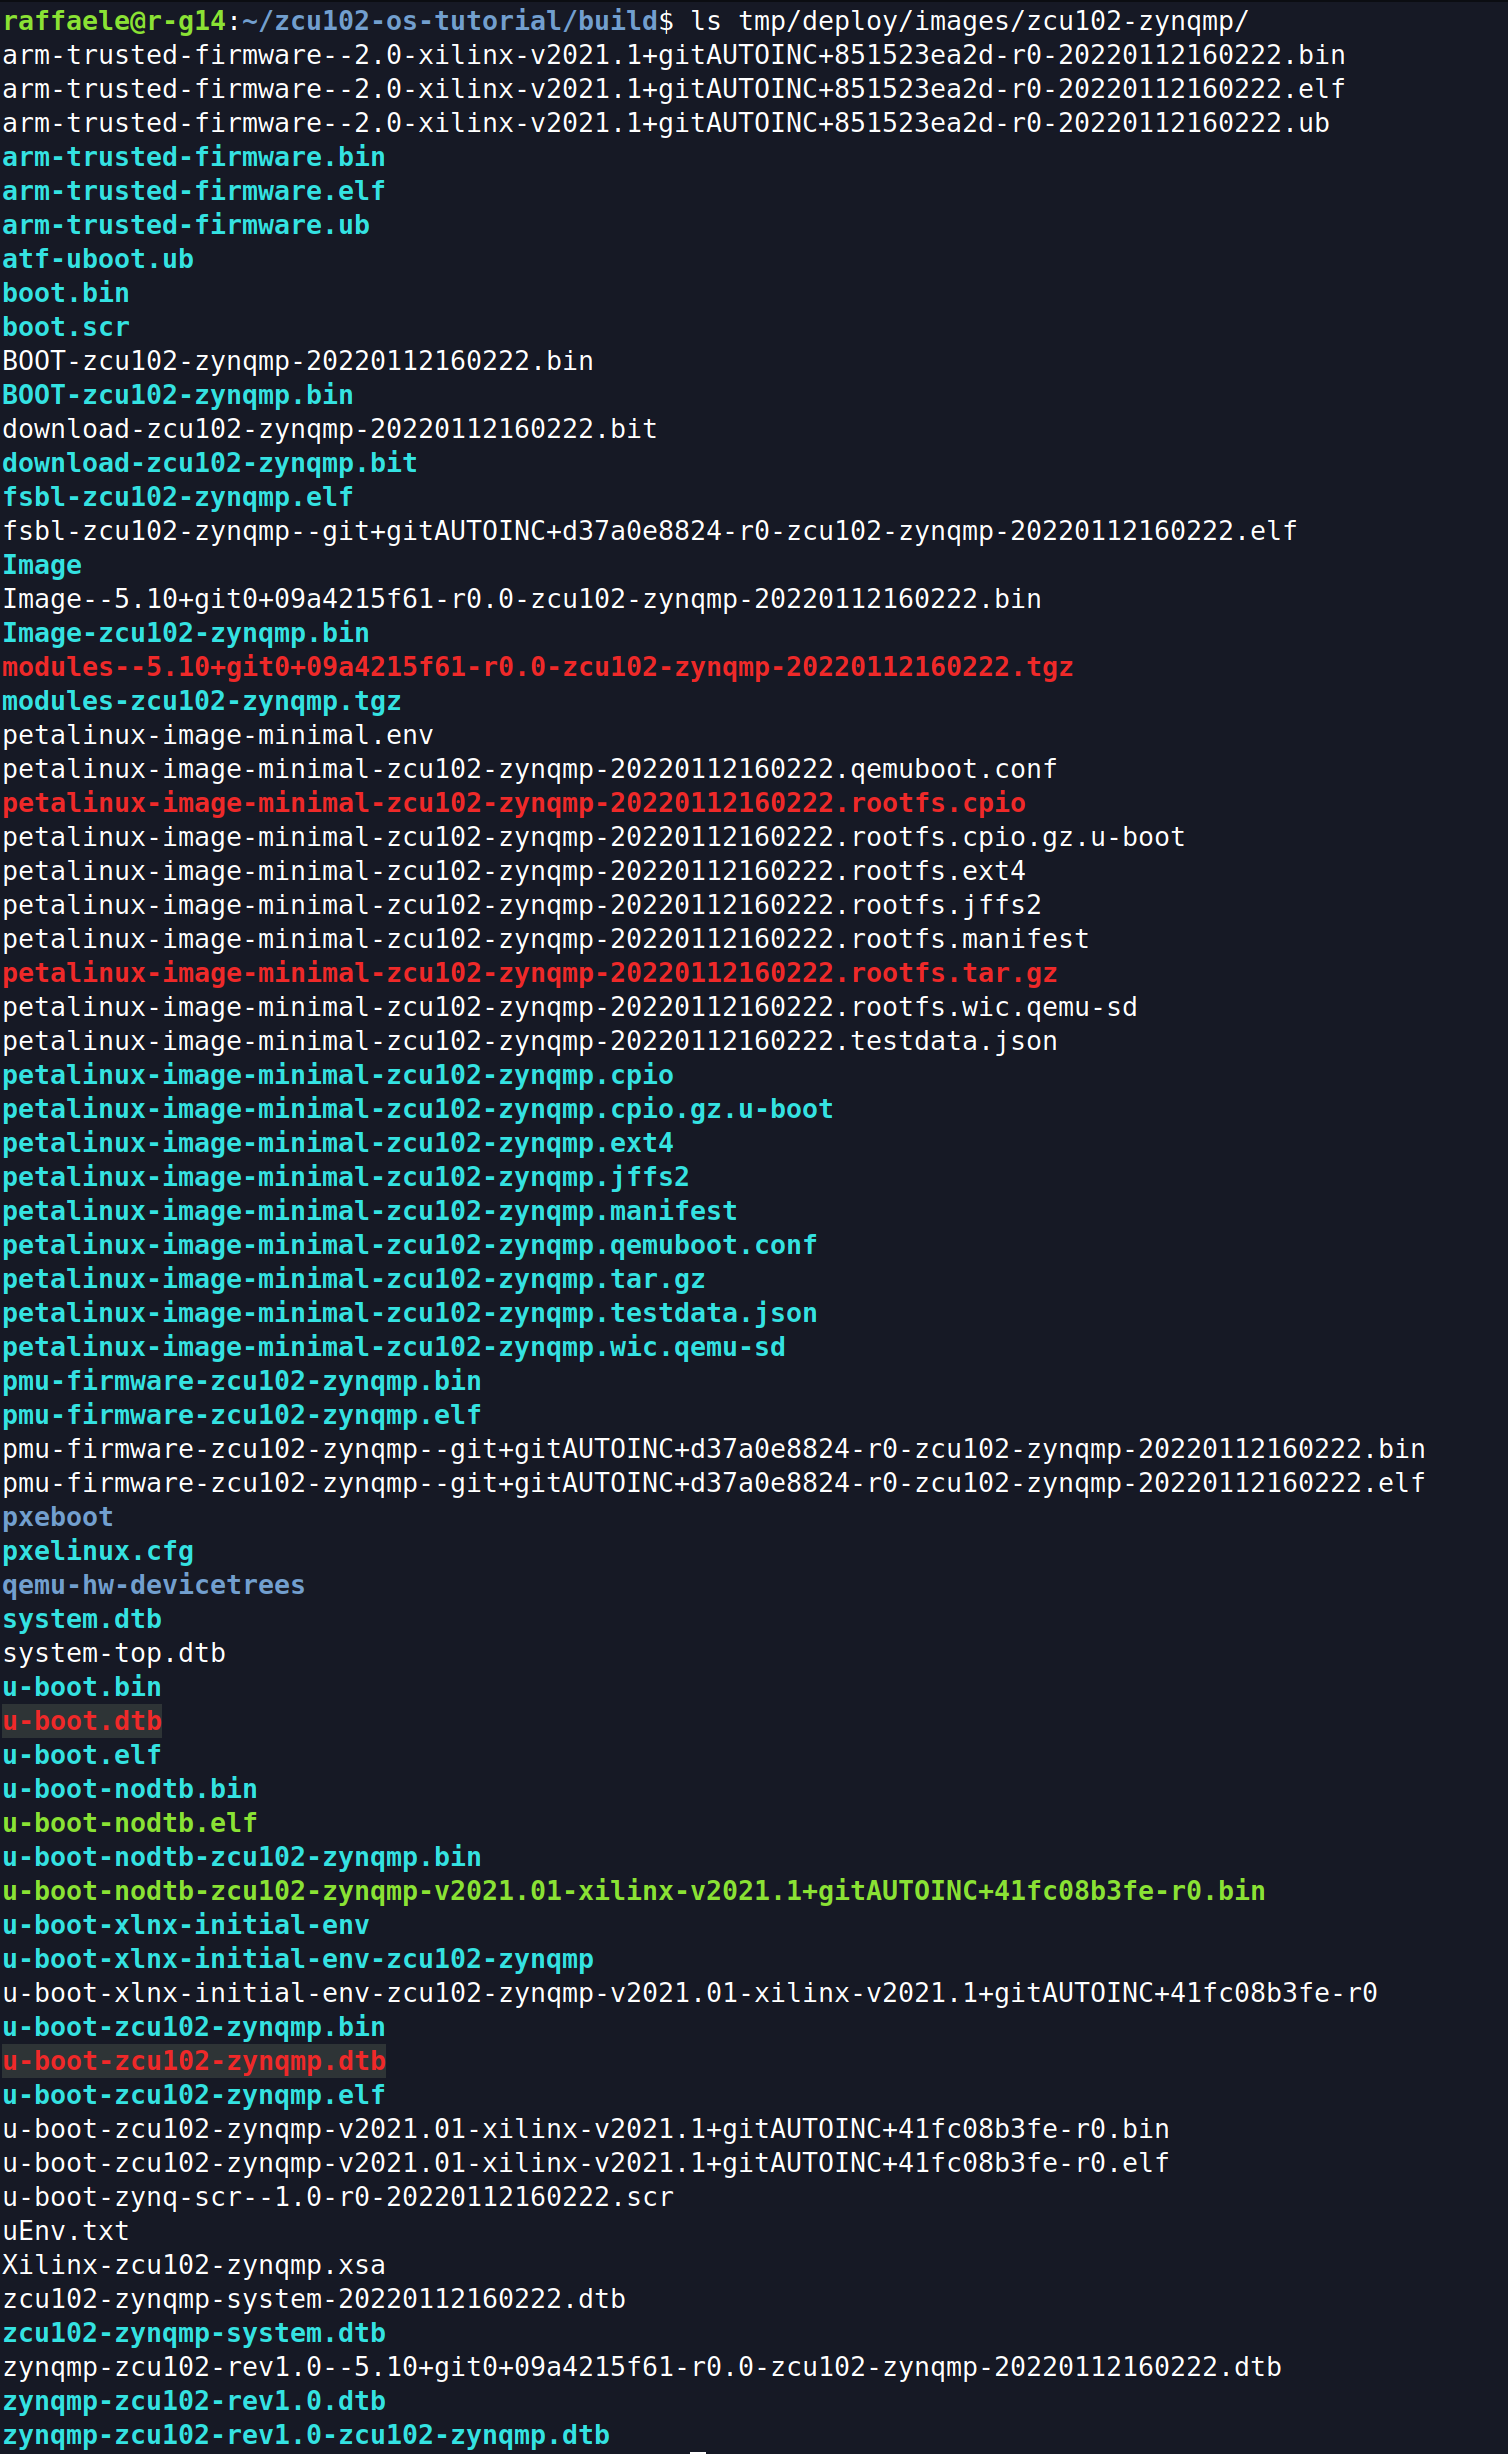
At the end of the process, image files are available at ./build/tmp/deploy/images/<target-machine>/ and they can be copied on an SD card.
Click to see deploy directory content
Additional functionalities
This section provides steps in order to extend the functionalities of the OS, such as allowing the FPGA runtime reconfiguration, adding the software development kit and USB 3.0 support.
FPGA runtime reconfiguration support
In order to use the FPGA at runtime from your OS, add this line to local.conf:
EXTRA_IMAGE_FEATURES += "fpga-manager"
Please take a look at FPGA programming options.
SDK tools
In order to use the Software Development Tools (gcc, make, pkgconfig etc.), edit the EXTRA_IMAGE_FEATURES variable within local.conf:
EXTRA_IMAGE_FEATURES += "debug-tweaks tools-sdk"
USB support
In order to use the USB port available on the UltraScale, more steps than previous two features are needed. If you want this functionality in your OS, please see the instrucions at this page Zynq USB Device Drivers.
Boot from SD card
Prepare an SD card creating two partitions, see this tutorial:
- The first one as a bootable partition (100MB, FAT16)
- The second one for the rootfs (EXT4)
Copy boot files in the first partition:
# cd into the deploy images directory
$ cd tmp/deploy/images/zcu102-zynqmp/

$ cp boot.scr boot.bin Image <path-first-partition>
$ cp zcu102-zynqmp-system.dtb <path-first-partition>/system.dtb
Extract rootfs tarball into the second partition:
$ sudo tar xf petalinux-image-minimal-zcu102-zynqmp.tar.gz -C <path-sd-second-partition>

Then connect the board (UART) to your laptop and check the serial port using dmesg.
$ dmseg | grep tty
# USB is usually connected to ttyUSB*
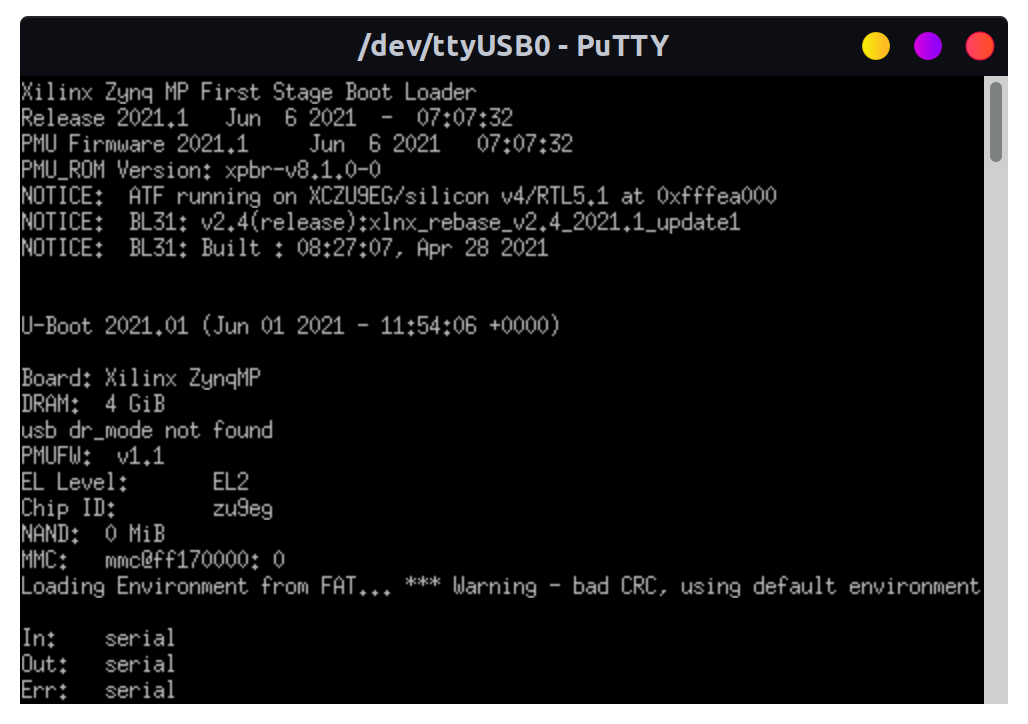
Open a terminal emulation program (e.g. Putty), executed with privileges (sudo).
| UART | Configuration |
|---|---|
| Baud rate | 115200 |
| Data bits | 8 |
| Stop bits | 1 |
| Parity | None |
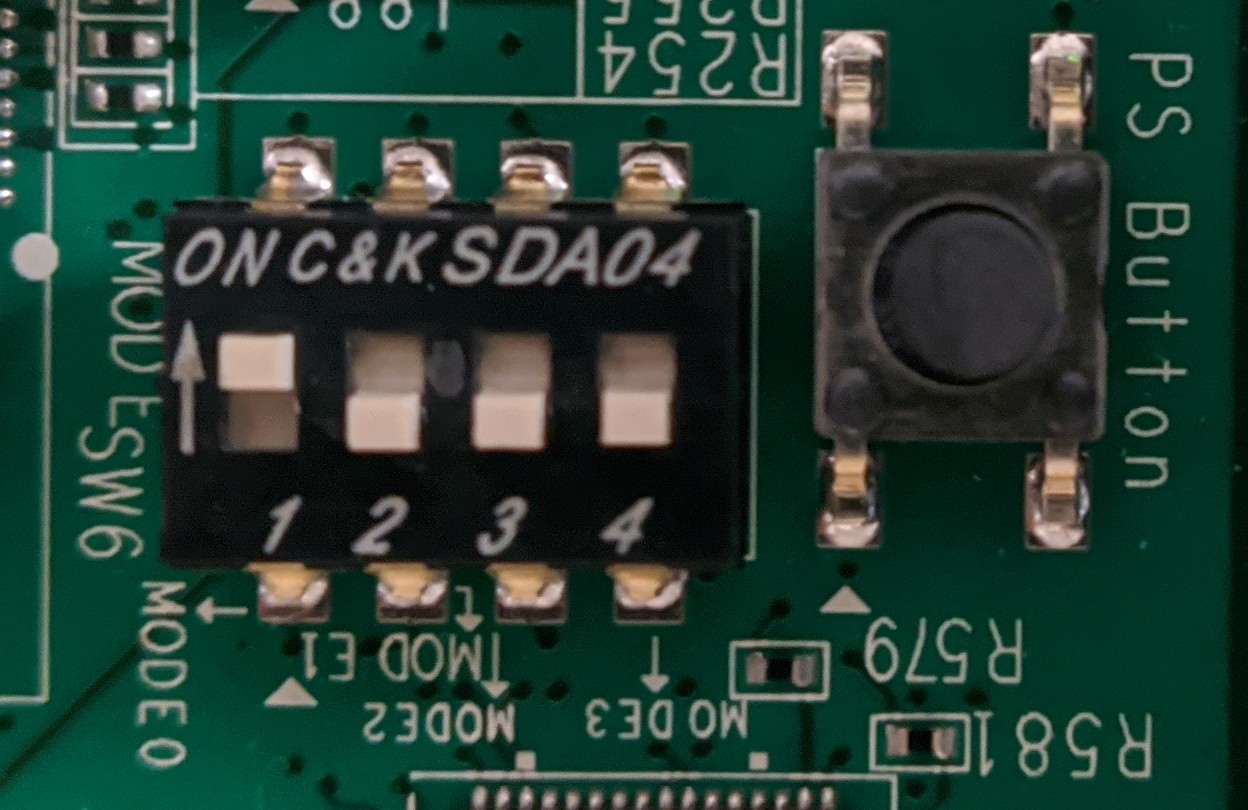
Finally set the switches (sw6) in boot SD mode (ON, OFF, OFF, OFF) and turn on the board.
Click to see the switches configuration
Click to see Linux shell for ZCU102

FPGA programming
If you have added the FPGA support, the fpgautil tool will be available on your system. It allows you to load a binary* version of a bitstream at runtime.
root@zcu102-zynqmp:~# fpgautil -h

fpgautil: FPGA Utility for Loading/reading PL Configuration in zynqMP

Usage:  fpgautil -b <bin file path> -o <dtbo file path>

Options: -b <binfile>           (Bin file path)
         -o <dtbofile>          (DTBO file path)
         -f <flags>             Optional:

# Useful links
<https://docs.yoctoproject.org/3.4/index.html>

<https://xilinx-wiki.atlassian.net/wiki/spaces/A/pages/18841862/Install+and+Build+with+Xilinx+Yocto> <AES User Key>
          -r <Readback>         Optional: <file name>
                                Default: By default Read back contents will be stored in readback.bin file
          -t                    Optional: <Readback Type>
                                   0 - Configuration Register readback
                                   1 - Configuration Data Frames readback
                                Default: 0 (Configuration register readback)
          -R                    Optional: Remove overlay from a live tree

Example:
(Load Bitstream)
fpgautil -b top.bit.bin
Troubleshooting
Following this tutorial you can encounter errors due to host packages. This is a list of solved errors:
- package require hsi FAILED
ERROR: pmu-firmware-git+gitAUTOINC+d37a0e8824-r0 do_configure: Execution of '/home/raffaele/bin/build/tmp/work/zcu102_zynqmp-xilinx-linux/pmu-firmware/git+gitAUTOINC+d37a0e8824-r0/temp/run.do_configure.1520032' failed with exit code 1: MISC_ARG is -yamlconf /home/raffaele/bin/build/tmp/work/zcu102_zynqmp-xilinx-linux/pmu-firmware/git+gitAUTOINC+d37a0e8824-r0/pmu-firmware.yaml APP_ARG is -app "ZynqMP PMU Firmware" Using xsct from: /home/raffaele/bin/build/xsct/Vitis/2021.1/bin/xsct cmd is: xsct -sdx -nodisp ...... ...... package require hsi FAILED: invalid command name "hsi::create_dt_node" while executing "hsi::create_dt_node -help" (in namespace eval "::hsi::help" script line 6) invoked from within "namespace eval ::hsi::help { variable version 0.1 ::xsdb::setcmdmeta {hsi create_dt_node} categories {hsi} ::xsdb::setcmdmeta {hsi create..." (file "/home/raffaele/bin/build/xsct/Vitis/2021.1/scripts/xsct/hsi/hsihelp.tcl" line 25) invoked from within "source /home/raffaele/bin/build/xsct/Vitis/2021.1/scripts/xsct/hsi/hsihelp.tcl" ("package ifneeded hsi::help 0.1" script)WARNING: exit code 1 from a shell command. ...... ......Solution: install
libtinfo5.Related issue: https://github.com/Xilinx/meta-xilinx-tools/issues/19.
- configure: error: raw selected, but required raw.h header file not available
 ERROR: util-linux-native-2.36-r0 do_configure: configure failed
 ERROR: util-linux-native-2.36-r0 do_configure: Execution of '/home/raffaele/zcu102-os-tutorial/build/tmp/work/x86_64-linux/util-linux-native/2.36-r0/temp/run.do_configure.350741' failed with exit code 1:
 automake (GNU automake) 1.16.2
 Copyright (C) 2020 Free Software Foundation, Inc.
 License GPLv2+: GNU GPL version 2 or later <https://gnu.org/licenses/gpl-2.0.html>
 This is free software: you are free to change and redistribute it.
 There is NO WARRANTY, to the extent permitted by law.

 Written by Tom Tromey <tromey@redhat.com>
     and Alexandre Duret-Lutz <adl@gnu.thisorg>.
 AUTOV is 1.16
 autoreconf: Entering directory .
 ......
 ......
 ......
 | checking for syscall prlimit64... SYS_prlimit64
 | checking for prlimit... yes
 | checking for syscall pivot_root... SYS_pivot_root
 | configure: error: raw selected, but required raw.h header file not available
 | WARNING: exit code 1 from a shell command.
 |
 ERROR: Task (virtual:native:/home/raffaele/zcu102-os-tutorial/sources/core/meta/recipes-core/util-linux/util-linux_2.36.bb:do_configure) failed with exit code '1'
 NOTE: Tasks Summary: Attempted 1010 tasks of which 0 didn't need to be rerun and 1 failed.
 NOTE: Writing buildhistory
 NOTE: Writing buildhistory took: 4 seconds

 Summary: 1 task failed:
 virtual:native:/home/raffaele/zcu102-os-tutorial/sources/core/meta/recipes-core/util-linux/util-linux_2.36.bb:do_configure
 Summary: There were 4 WARNING messages shown.
 Summary: There were 2 ERROR messages shown, returning a non-zero exit code.
In recent linux kernel raw.h file was removed.
Solution: append this line in your
conf/local.conf(preferred)# Fix configure: error: raw selected, but required raw.h header file not available for new host kernels EXTRA_OECONF_remove = "--enable-raw"or remove directly
--enable-rowfrom EXTRA_OECONF in./sources/core/meta/recipes-core/util-linux/util-linux_2.36.bb.Related issue: fix enable raw.
This list will be updated over time.